
Abstract
Musculoskeletal (MSK) symptoms are one of the most common reasons for patients to seek medical attention. Despite the high prevalence of musculoskeletal disorders in all fields of clinical practice, doctors continue to describe poor confidence in their musculoskeletal clinical skills. Here in this chapter an overview of the epidemiology of MSK disorders and the current status of MSK competency skills among clinicians will be discussed. Then a general approach to MSK examination will be introduced. The rest of the chapter will address detailed approach to upper limb and lower and back joints examination. Each section will start with a brief approach to pains originating from each site. Good history is part of the MSK examination.
You have full access to this open access chapter, Download chapter PDF
1 Introduction
Musculoskeletal (MSK) symptoms are one of the most common reasons for patients to seek medical attention. Despite the high prevalence of musculoskeletal disorders in all fields of clinical practice, doctors continue to describe poor confidence in their musculoskeletal clinical skills. Here in this chapter an overview of the epidemiology of MSK disorders and the current status of MSK competency skills among clinicians will be discussed. Then a general approach to MSK examination will be introduced. The rest of the chapter will address detailed approach to upper limb and lower and back joints examination. Each section will start with a brief approach to pains originating from each site. Good history is part of the MSK examination.
1.1 Objectives
-
1.
To discuss the current status of musculoskeletal (MSK) examination competency skills among clinicians.
-
2.
To construct a diagnostic approach to single joint pain.
-
3.
To demonstrate a comprehensive approach to MSK examination of all body joints.
2 Epidemiology of Rheumatic Diseases
MSK symptoms are the most common health complications requiring medical attention and accounting to 20% of both primary care and emergency room visits. MSK conditions affect one in five adults [1]. In a health survey, MSK disorders were ranked first in prevalence as the cause of chronic health problems, long-term disabilities, and consultations with a health professional [2]. In Saudi Arabia, MSK disorders are the second major cause of outpatients visit in primary care centers and private clinics. This is corresponding to findings in several other reports from different parts of the world. Low back pain is the most prevalent of musculoskeletal conditions; it affects nearly everyone at some point in time and about 4–33% of the population at any given point [2].
MSK disorders are a very common cause of health problems. They result in limiting work in developed countries. Besides, up to 60% of people on early retirement or long-term sick leave claim a MSK problem as the reason [1].
3 Current Status of MSK Examination
A continuous neglect is observed in musculoskeletal examination skills in clinical practice. Thus problems of patients with complaints about bones and joints are often ignored and underestimated by doctors. Many studies suggest that training in MSK disorders is inadequate in both medical schools and most residency training programs. In Saudi Arabia and in many parts of the world, undergraduate and postgraduate medical teaching of MSK disorders is currently brief and not directly relevant to the knowledge and skills commonly required for management of these conditions in an outpatient setting [1, 3]. Educational deficiencies in MSK disorders have been reported extensively in undergraduate curricula and postgraduate training programs (Box 2.1) [3].
Box 2.1 Educational deficiencies in MSK examination skills
Causes of musculoskeletal (MSK) examination skills deficiencies [2] | Solution of MSK examination deficiency [2] |
|---|---|
1. Vague training of MSK disorders in undergraduate programs. 2. Examination of the MSK system is often regarded to be complex in comparison with other organ systems. 3. Underestimation of the prevalence of MSK conditions and their impact on individuals and society. 4. MSK disorders are not considered to be main competencies of medical graduates because they are not life threatening conditions. 5. The lack of standardized approach to the clinical assessment of MSK problems, whether pertaining to primary care, rheumatology, or orthopedics. 6. Lack of proper standard teaching in MSK disorders results in the low competence in MSK examination skills. 7. Lack of summative evaluation of MSK examination skills contributes to low level of competency among medical graduates. 8. The disparity in the approach to examination between rheumatologists and orthopaedic surgeons mostly lead to poor performances in MSK examinations. 9. The lack of appropriate teaching and evaluation in MSK disorders; clinical teachers are not usually skilled in MSK examinations and thus bone and joint diseases are not screened. | 1. To define competencies that should be mastered while dealing with MSK disorders. 2. To agree on what MSK skills should be mastered by medical students. 3. Standardized approach to the clinical assessment of MSK problems (Figs. 2.1 and 2.2).  Anatomy of the hand  (a) Wrist flexion and (b) wrist extension 4. Experts in various specialities work more closely together and look for the commonality of approach when treating a patient as they often treat the same patients but from separate angles. 5. Another solution would be an integrated MSK disease course for medical students, bringing together orthopedics, rheumatology, and physical medicine and rehabilitation. This approach has been found to be effective. 6. The method of teaching MSK examination skills should follow interactive approaches and hands-on teaching sessions where learners are involved in the teaching process. |
As there is no standardized approach to the clinical assessment of MSK problems, one of the direct solutions for this is to have unified approach to MSK disorders. The approach should consist of screening examination (this is basically active range of motion testing (ROM)), inspection, palpation, ROM, and special tests (see below). The other direct solution is to have a clear objective from each MSK examination encounter based on historical facts obtained from patients. Each clinician should have then an objective for the MSK examination, whether signs of arthritis to be sought or signs of periarthritis with soft tissue inflammation (ligaments, tendons, bursae, cartilage, etc.). For example, a young female patient with small joints pain for 6 weeks should have a different objective for the MSK examination than a young male with knee joint pain following a football match. The objective for the MSK examination for the female patient with small joints pain should be to look for signs of arthritis, while the objective for the MSK examination of the male patient is to look for signs of periarthritis mainly ligamentous or meniscus injuries in his knee. This is not to underestimate the comprehensive approach to any joint with performing all steps (screening, inspection, palpation, ROM, special tests) but rather to get more focus on the techniques that should yield the signs suggestive of the preliminary diagnosis that was made initially based on the history obtained from the patient.
A number of different medical specialties are usually involved in treating patients with musculoskeletal complaints. This comprises general practitioners, family physicians, internists, orthopedic, and surgeons. However, the various practitioners may work in teams with other health professionals, but they often lack a multispecialty focus which results in treating the same patients in a segmented manner and from different inconsistent angles.
Based on a literature review published with details in reference [2], Box 2.1 shows some summarized causes of MSK examination skills deficiencies. Some suggested solutions were mentioned as well. One of these solutions is to have a standardized approach to MSK examination (see examination of the hand and wrist joints) (see Table 2.1.)
4 General Approach to MSK Examination
Clinicians have perceived the MSK examination across the world as complex and difficult to perform. This can be solved if the approach to MSK examination across different disciplines were unified. This approach starts by initiating the MSK examination using the following steps:
-
Inspection: The basic anatomical structures overlying joints should be inspected for any changes. This includes inspection of the skin, tendons, muscles, and bones (joints). Skin changes like redness, rashes, and color changes should be noted. Loss of skin wrinkling may indicate swelling in underneath structures. Synovial sheaths covering tendons might be swollen. Muscles might be wasted. Bone and/or deformities might be obvious to observe.
-
Screening exam: this is basically an active range of motion (ROM) testing to assess for gross pathology. The patient performs the full range of movement of the examined joint by own effort. If the active ROM was entirely normal without any limitation and/or pain, the joint examined can be considered normal. This step is introduced early on in this approach in order to focus the detailed MSK exam in joints with significant abnormal active ROM testing. The screening exam might be normal for arthritis affecting small joints of the hand and/or feet particularly in early stages of arthritis.
-
Palpation: this is basically palpating for tenderness over different anatomical structures (bone, joint, tendons, bursae, fascia). Tenderness over the joint line (where two bones forming the joint are meeting) might indicate arthritis. There are special approaches to palpate small and large joints that will be explained in this chapter. Palpation for one of the cardinal signs of inflammation, hotness (warmth), should be considered as well.
-
Range of motion testing: there is active and passive ROM testing. If you have done the active ROM during the screening exam, you may now just perform the passive form or repeat it again. In cases of true intra-articular disease process (true inflammation of synovial membrane as in case of inflammatory arthritic disorders, for example, rheumatoid arthritis or psoriatic arthritis), the active and the passive ROM will be both restricted. While in cases of periarticular disease processes (affecting tendons, ligaments, bursae, fascia) the active ROM will be restricted and/or limited with tenderness, the passive ROM should be entirely normal. It is normal because you exclude the contribution of the affected tendon or ligament in the movement by doing it passively. However, there are exceptions to this general rule. Handling of the joints during MSK examination is essential. You should avoid assessing ROM while you are holding the joint itself. You should hold the assessed joint from distal and proximal areas trying also to hold other joints. You should mainly assess the ROM by holding bony structures forming the joint rather than the joint itself. This is not to cause pain over the joints from your holding. An issue might interfere with your ability to evaluate the origin of the pain; whether from the ROM or from your holding that causes stress over the joint results in pain.
-
Special tests: these tests are conducted to examine for possible causes of the joint pain particularly soft tissue structures around the joint. As a general rule to examine for tendon- and/or ligament-related problems, you need to “stretch” the tendon to assess if this stretch can aggravate the symptoms and/or to “stress” it. If the function of tendon that you are assessing is extension, for example, to stress it you need to exert your force as an examiner in flexion while the patient is maintaining his joint in extension and resisting your flexion. If there is tenderness while performing this test, it might be due to tendinitis.
-
Complete your exam: the MSK exam for any particular joint is not complete without evaluating other joints (above and below the joint being examined). In addition, a neurovascular evaluation is essential to exclude any possibility of neurological and/or vascular origins of the joint pain. Assessing peripheral pulses, examining the motor system, and evaluating for sensory loss are essential for comprehensive evaluation.
There are two important steps that should be addressed for any patient with joints pain. The first is determining in your history the location of the pain whether it is anterior, posterior, lateral, or medial pain. This could be achieved by simply asking the patient to point by his/her finger to the site that is causing pain at the joint. Each one of these sites has its differential diagnosis as a cause for pain. This should lead to the next step that is considering the anatomical structures at the site of the pain determined by the patient. You should continue taking your comprehensive history addressing the risk factors and trying to rule in or rule out the possible differential diagnosis you created by now from these steps.
After completing your history, you should determine now the objective of your MSK examination. Examining a young female who presents with small joints pains should have different objective than examining a young college student who presents with knee joint pain after a soccer game! For the young female patient, your objective should be looking for signs of arthritis: small joints pain swelling and/or tenderness. You may base on your history to look for signs of systemic lupus erythematosus, for example. While the objective of MSK examination for the college student should be to look primarily for signs of soft tissue injuries in his affected knee. This is not to underestimate the value of performing comprehensive MSK examination for the affected joint. It is rather a process to construct an approach to diagnosis utilizing historical findings and combining it with an objective-oriented MSK examination.
The following section is divided into three: the upper limb, the lower limb, and the back examination. Each section starts with a brief review of the anatomy and then a description on the approach to pain origination from that particular joint. This is followed by a stepwise approach to examination of that joint using the inspection, screening exam, palpation, ROM, and special tests approach. The reader should realize the importance of applying the knowledge learned from this chapter into practice. This continued practice is the assuring way to the mastery level in competency skills in MSK examination.
5 Musculoskeletal Examination of Upper Limb Joints (Fig. 2.1)
The joints included in upper limb are hand and wrist, elbow, and shoulder. There is a brief review of the important anatomical landmarks that should be mastered because it has clinical correlations. This will be referred to as the first step. Then an approach to pain originating from this joint will be discussed focusing on anatomical differential diagnosis. The second step will be to follow the stated approach in MSK examination with descriptions whenever it is necessary. Illustrations have been used sometimes as a self-explanatory toll.
5.1 The Hand and Wrist Joints
5.1.1 First Step: The Anatomy
5.1.1.1 Anatomy of the Hand Joints (Fig. 2.1)
Each hand consists of 27 bones: 8 carpals, 5 metacarpals , and each finger having three phalanges except the thumb which has only two phalanges (Fig. 2.1). The joint is the articulation between two bones, so between the two phalanges there is interphalangeal joints, proximal (PIP) and distal (DIP); between the phalanges and metacarpal bones, metacarpophalangeal joint (MCP); between the metacarpals and carpal bones, carpometacarpal joint (CMC); and between the carpals bones, the intercarpal joints.
There are around 62 muscles in the hand divided as intrinsic and extrinsic muscles. The intrinsic muscles are thenar, hypothenar, and interosseous muscles. The extrinsic muscles are flexors in the volar of the hand and extensors in the dorsum of the hand. There is also the synovial sheath, which is always involved in inflammatory arthritis.
The hand is innervated by three important nerves, which are radial nerve providing sensory supply to the dorsum of the hand, median nerve providing sensory supplies to three, and half finger and ulnar nerve sensory supplying the little finger and half of ring finger. All the small muscles of the hands are supplied by ulnar nerve except (LOAF) the lateral two lumbricals, opponens pollicis, the abductor pollicis brevis, and the flexor pollicis brevis. Be aware that the extensors of the thumb are supplied by radial nerve.
5.1.1.2 Approach to Hand Pain
The approach of any patient presenting with hand pain should include:
-
History.
-
Physical examination.
-
Differential diagnosis.
In the history, you should ask about the location of the pain whether it is located in the dorsal, volar, radial, or ulnar sides of the hand (Table 2.1). Then you should think about the anatomical structures in each one of these sites and what possible diseases might cause the pain.
If the patient presents with dorsal pains, the anatomical structures that might be included are MCPs, PIPs, DIP joints, or wrist joint. The diseases that affect these joints are mainly arthritic disorders. Detailed approach to history taking should be undertaken as it was explained in Chap. 1. Tendons can be involved which result in tendinitis or, if the entire finger is swollen, dactylitis.
The anatomical structures included in patients presenting with volar pains are flexor tendons causing flexor tenosynovitis or what is known as trigger finger. Palmar fascia involvement results in Dupuytren’s contracture. Median nerve compression as it passes below the flexor retinaculum causes a condition called carpal tunnel syndrome.
If the patient presents with radial pain (the thumb), the anatomical structure are snuffbox area. This is surrounded laterally by tendons of extensor pollicis brevis and abductor pollicis longus muscles, medially by tendon of extensor pollicis longus muscle and in the roof the scaphoid bone. The classical diseases affecting this area are de Quervain’s tenosynovitis and first carpometacarpal osteoarthritis. Other diseases like thumb fracture and extensor carpi radials tendinitis are less commonly observed.
Ulnar pain is rare. Possible diseases affecting this site of the hand could be originated from ulnar nerve compression, tenosynovitis of flexor carpi ulnaris, and/or traumatic injuries.
It is always:
-
Inspection.
-
Screening exam.
-
Palpation.
-
Range of motion.
-
Special tests.
5.1.2 Second Step: The Approach
Remember:
-
Always inspect dorsal and palmar aspects.
-
Start distally to proximally.
5.1.2.1 Inspection
Nails: evidence of psoriasis, vasculitis.
Skin: redness, scars, rashes.
Muscles: wasting, atrophy.
Bones and joints: swelling, deformities.
5.1.2.2 Screening Exam
The aim is to screen for gross pathology.
-
It is basically active ROM testing.
-
First, extend fingers and wrist (palmar aspect upward). Make a fist, and then extend again. Make a tuck position, and then extend again. Make a prayer sign and then wrist flexion with all fingers facing the ground opposite of the prayer sign. Lastly, assess grip strength (Fig. 2.2).
5.1.2.3 Palpation
The major aim is to look for evidence of arthritis in the form of warmth, effusion, and joint line tenderness.
Palpate: joints, bone, and soft tissue.
Start with dorsum of the hand for nodules; palpate MCPs with a scissor technique and PIPs and DIPs with four fingers technique, follow the third metacarpal bone to feel capitate and the joint line of the wrist; and then feel scaphoid in the anatomical snuff box and other bones for tenderness.
Make a scissor-like shape with your fingers, joining the index and middle fingers together and joining the ring and little finger together. Hold the patients hand from the sides at MCPs level. Flex the MCPs to 90° and with your two free thumbs from both hands, feel the joint line for every MCP joint to assess for effusion, swelling, and/or tenderness (Fig. 2.3) [3].

Scissor technique
This technique is called four fingers because you should use your four fingers which are the thumb and index finger of each hand (Fig. 2.4). With your thumb and index fingers of one hand, hold each PIP from the side and press firmly. With your other hand’s thumb and index fingers, hold the same PIP joint from an anteroposterior direction and push intermittently in and out, looking for effusion, swelling, and/or tenderness [3].

Four fingers technique
With your thumb, follow the third metacarpal bone on the dorsal aspect of the hand until reaching a dimple at the capitate level (Fig. 2.5). Your thumb should exert a firm, continuous pressure on this point with your other thumb pushing intermittently in and out, just half an inch away from the other thumb on the wrist joint line, looking for effusion, swelling, and/or tenderness [3].

Two thumbs technique
5.1.2.4 Range of motion
-
You have done active ROM in your screening exam.
-
Do it again for the wrist joint: extension, flexion, ulnar deviation, and radial deviation.
-
For passive ROM of the wrist: hold the distal forearm with one hand, and grasp the palmar aspect with the other hand. Avoid holding the hand from the MCP site as this might be painful if there is arthritis.
-
Now move the wrist passively to extension, flexion, ulnar deviation, and radial deviation.
-
You should observe and comment on tenderness, stiffness, and/or limitation of movement and end-range stiffness. All these are expected signs of arthritis.
5.1.2.5 Special tests
-
This is to assess stability of the wrist joint. This is important particularly in pain in wrist joint following traumatic injuries.
-
For de Quervain’s tenosynovitis: do Finkelstein’s test (Fig. 2.6). This is simply a trial to overstretch the tendon and examine for tenderness if it is elicited with this technique to suggest the diagnosis. To stress the tendon, push the extended thumb to flexion and ask the patient to resist your flexion. If there is pain, this would confirm the diagnosis.
Fig. 2.6 
Finkelstein’s test
-
Carpal tunnel syndrome is reviewed thoroughly in “Diabetes and Rheumatology” Chap. 21.

5.2 The Elbow Joint
5.2.1 First Step: The Anatomy (Figs. 2.7 and 2.8)
The elbow joint is composed of three bones, which articulate together to form three joints, three ligaments, and muscles. The bones that form the joints are the distal part of the humerus, the proximal part of the radius, and the ulna laterally and medially. They articulate together to form three joints, the humeroulnar joint, the radiohumeral joint, and the proximal radioulnar joint. These joints are held together through a network of ligaments; the major three ligaments are the medial collateral ligament, the lateral collateral ligament, and the annular ligament. What makes the elbow flex, extend, supinate, and pronate are the muscles of the elbow joint, such as the biceps muscles and its tendon, the triceps muscles, the brachioradialis, the flexor forearm muscles attached to medial epicondyle, and the extensor forearm muscles attached to lateral epicondyle. Branches from median, ulnar, musculocutaneous, and radial nerves supply this joint.

Elbow Joint anatomy: bones

Elbow Joint anatomy: nerves and ligaments
5.2.1.1 Approach to Elbow Pain
The approach to any patient presents with elbow pain should include:
-
History.
-
Physical examination.
-
Differential diagnosis.
In the history you should determine the location of the pain by simply asking the patient to point to the tender spot in his elbow. Lateral elbow pain is the most common site for clinical presentation. Other sites are medical and posterior elbow pains. After determining the site, then a simple standard approach should be followed including the onset of the pain, its duration, severity, radiation, aggravating and reliving factors, and history of trauma. The occupation of the patient as well as detailed history of sports activities is essential to obtain. Repetitive minor trauma from overuse might precipitate epicondylitis with micro tears affecting the common tendon insertion. You may ask also about functional limitation, swelling, and/or instability of the joint. A swollen elbow should lose its ability to be fully extended. History of shoulder and/or neck pain should be obtained as pain in the elbow may be simply a referred one from these sites.
5.2.1.2 Differential Diagnosis
Depends on the location of pain (Box 2.2).
Box 2.2 Differential Diagnosis of Elbow Pain
Lateral elbow pain |
|---|
Common: 1. Lateral epicondylitis 2. Referred pain (cervical, upper thoracic spine) |
Less common: 1. Synovitis 2. Radiohumeral bursitis 3. Radial tunnel syndrome (posterior interosseous nerve entrapment) |
Not to be missed: 1. Osteochondritis dissecans. |
Medial elbow pain |
|---|
Common: 1. Medial epicondylitis 2. Medial collateral ligament sprain |
Less common: 1. Ulnar neuritis 2. In children: Avulsion fracture of the medial epicondyle |
Not to be missed: 1. Referred pain |
Posterior elbow pain | |
|---|---|
1. Olecranon bursitis 2. Triceps tendinopathy 3. Posterior impingement |
It is always:
-
Inspection.
-
Screening exam.
-
Palpation.
-
Range of motion.
-
Special tests.
5.2.2 Second Step: The Approach
5.2.2.1 Inspection
Examine both elbows for asymmetry
Expose the upper arm completely and examine:
-
Skin: rashes, abrasions, erythema, redness, scars, subcutaneous nodule, subcutaneous psoriasis.
-
Muscle: wasting, atrophy.
-
Bones and joints:
-
Swelling: localize over olecranon bursae, e.g., olecranon bursitis or diffuse particularly in area between olecranon process and lateral or medial epicondyle, e.g., elbow arthritis.
-
Deformity: assess the carrying angle (Fig. 2.9):
Fig. 2.9 
Abnormality in carrying angle: (b, d) Cubitus valgus. (a, c) Cubitus varus (gunstock deformity). Effect of swelling: it holds the joint in partial flexion [4]
Ask patient to extend arm in anatomical position (palm facing anteriorly), the longitudinal axes of upper arm and forearm from a lateral (valgus) angle at elbow joint known as the carrying angle (5°in male, 10°–15° in female).
-

5.2.2.2 Screening Exam
-
The aim is to screen for gross pathology.
-
It is basically active ROM testing (Fig. 2.10).
Fig. 2.10 
Active range of motion of the elbow joint
-
A quick way to evaluate this is to ask patient to comb the hair and watch any abnormal moment.
-
Ask patient to do:
-
Extension.
-
Flexion.
-
Supination.
-
Pronation.
-

Ulnar nerve: runs in capital groove behind the medial epicondyle.
5.2.2.3 Palpation
Should include palpation of:
-
Skin and soft tissue: muscles, ligaments, tendons, and epitrochlear lymph nodes. This lymph node is located just 1 cm above medical epicondyle in the antecubital fossa and then 1 cm distally on the shaft of the ulna. It is hard to feel in obese patients.
-
Bony landmarks that should be palpated:
-
Medial epicondyle: any tenderness suggestive of medical epicondylitis.
-
Medial epicondylar ridge: any tenderness suggestive of elbow joint arthritis?
-
Lateral epicondyle: any tenderness suggestive of lateral epicondylitis?
-
Lateral epicondylar ridge: any tenderness.
-
Olecranon process: any tenderness suggestive of olecranon bursitis?
-
Superficial surface of the ulna (as far distal as the wrist).
-
Radial head.
-
-
Elbow joint line: palpate for tenderness, effusion, and/or nodules.
Start by palpating the posterior aspect: the three palpation landmarks (the medial epicondyle, the lateral epicondyle, and the apex of the olecranon) form an equilateral triangle when the elbow is flexed 90° and a straight line when the elbow is in extension. The points between the olecranon process while the elbow is in 90° of flexion and the medical or lateral epicondyle represent the joint line of the elbow joint (Fig. 2.11). If there is tenderness elicited while palpating these points, it indicates elbow joint arthritis. Otherwise, effusion may be elicited by palpation.

Some anatomical landmarks in the elbow joint. O: olecranon process, M: medial epicondyle, L: lateral epicondyle
5.2.2.4 Range of Motion
-
You have done active ROM in your screening exam.
-
Place one of your examining hands just above the elbow joint holding the distal end of the arm. The other hand should be holding the distal end of the forearm just few centimeters above the wrist joint. Examine passive range of motion for the following actions:
-
Flexion: bend the patient’s elbow slowly by bringing both of your hands together.
-
Extension: move your hands away from each other to extend the patients elbow. Note that some patients particularly females may have hyperextensible joints that may cause few extra-degrees of elbow hyperextension.
-
Supination: with the hand holding the distal forearm, bring the palm of the patient to let it face upward.
-
Pronation: now let the palm face downward.
-
Presence of tenderness, limitation, stiffness, and/or end of range stiffness may indicate presence of arthritis.
5.2.2.5 Special Tests
5.2.2.5.1 Golfer’s Elbow Test
This is to test for medial epicondylitis.
Ask the patient to have their elbow and fingers flexed. Palpate the medial epicondyle with one hand, and grasp the patient’s wrist with the other hand, and then ask the patient to flex the elbow and wrist against resistance (Fig. 2.12). A positive test would be a complaint of pain or discomfort along the medial aspect of the elbow in the region of the medial epicondyle.

A special test for medial epicondylitis
5.2.2.5.2 Tennis Elbow Test
This is to test for lateral epicondylitis.
Ask the patient to have their elbow and fingers extended. Palpate the lateral epicondyle with one hand, and grasp the patient’s wrist with the other hand, and then ask the patient to extend the elbow and wrist against resistance (Fig. 2.13). A positive test would be a complaint of pain or discomfort along the lateral aspect of the elbow in the region of the lateral epicondyle.

A special test for lateral epicondylitis: see text
5.2.2.5.3 Elbow Flexion Test (Ulnar Nerve)
This test is to evaluate for cubital tunnel syndrome (Fig. 2.14).

Elbow flexion test
Ask the patient to hold their elbows fully flexed for 3 min with their wrists in neutral position and their shoulders adducted at their sides. The test is considered to be positive if paresthesias were elicited within the ulnar nerve distribution of the hand.
5.3 The Shoulder Joint
5.3.1 First Step: The Anatomy (Fig. 2.15)
The shoulder consists of three bones, four articular surfaces, muscles, and ligaments. The bones include clavicle, proximal humerus, and scapula. The articular surfaces include sternoclavicular joint, acromioclavicular joint, glenohumeral joint, and scapulothoracic articulation. The muscles of shoulder are rotator cuff which includes supraspinatus, infraspinatus, subscapularis, and teres minor. The subscapularis muscle rotates the humerus internally, while the infraspinatus and teres minor rotate the humerus externally. Abduction of the humerus is accomplished by supraspinatus along with deltoid muscle.

Anatomy of the shoulder joint
For the ligaments of the shoulder, they are the glenohumeral ligaments which are superior, middle, and inferior glenohumeral ligaments.
5.3.1.1 Approach to Shoulder Pain
Shoulder pain represents either intrinsic or extrinsic pathologies. Intrinsic pathologies account for 85% of the cases and include traumatic, acute, and chronic causes. While extrinsic pathologies account only for 15% of the cases which represent referred pain that can be of cardiac, respiratory, gastric, or diaphragmatic in origin. The approach to patients present with shoulder pain should always start with:
-
History.
-
Physical examination.
-
Differential diagnosis.
Start analysis of the shoulder pain by first determining the site of the pain. To assure accurate workup you may ask the patient to point one finger to the site of the pain by one finger. Shoulder pain can be classified into three categories according to the site: anterior, lateral, or posterior (Table 2.2).
Lateral shoulder pain is the most common, and it is classical for rotator cuff tendinitis. Anterior shoulder pain is classical for glenohumeral arthritis. Posterior shoulder pain, which is the least common, usually represents referred pain.
Following this step you need to cover other aspects of pain history to help you narrow the differential diagnosis according to the anatomical location and other important pieces of information you are going to collect from the patient. This should include the duration, nature, aggravating factors (with lifting, reaching or pushing) and relieving factors, radiation (shoulder pain that radiates past elbow can be due to cervical pathology), history of trauma, and sports activities. Past medical history: diabetic and patients with thyroid diseases are at risk of developing adhesive capsulitis.
It is always:
-
Inspection
-
Screening exam
-
Palpation
-
Range of motion
-
Special tests
5.3.2 Second Step: The Approach
Remember:
-
Always inspect anteriorly, laterally, and posteriorly
5.3.2.1 Inspection
-
Skin: redness, scars, rashes.
-
Muscles: wasting, atrophy of deltoid (squaring sign).
-
Bones and joints: swelling particularly anteriorly obscuring the coracoid process area; this is in case of glenohumeral joint effusion, deformities (acromioclavicular (AC) joint, clavicle), scapula elevation (back), and asymmetry posteriorly (look at back exam for asymmetry).
5.3.2.2 Screening Exam
The aim is to screen for gross pathology.
-
It is basically the active ROM testing (Fig. 2.16).
Fig. 2.16 
Range of motion testing for shoulder joint
-
Ask the patient to abduct (ABD) shoulders to 90°, then supinate forearms (externally rotating (ER) the shoulders), continue abduction to 180°, do painful arc by bringing both shoulders to zero position again (if the patient develops pain, it indicates positive painful arc test suggestive rotator cuff tendinitis (RCT)), then ask patient to bring his hands behind the neck (ER + ABD), and then move hands backward over the back internal rotation (IR) and adduction (ADD) (IR + ADD). Then try bringing your thumbs on your back as high as possible (Apley’s scratch; Fig. 2.17), and finish with forward flexion and extension.
Fig. 2.17 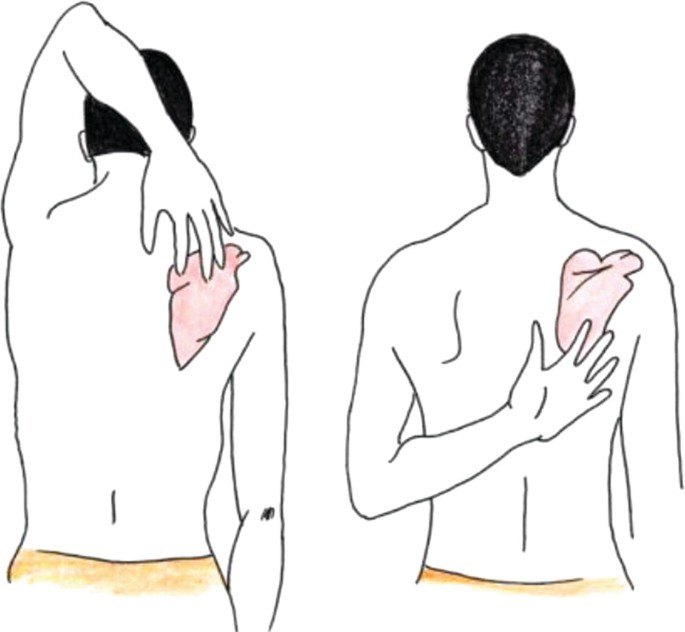
Apley’s scratch test
-
Shoulder elevation, protraction, retraction, and circumduction.


5.3.2.3 Palpation
-
Remember: shoulder (or glenohumeral joint) effusion is usually detected anteriorly (this is not a common finding).
-
Palpate for bony and soft tissue structures: start with sternoclavicular joint (SC joint), then move to feel clavicle, AC joint, acromion, subacromial bursae (a lateral structure just below the acromion) (tenderness indicates RCT, greater trochanter (GT) (rotator cuff inserts here, you are feeling the capsular attachment of glenohumeral joint (GH joint) medially feel bicipital groove (long head of biceps), coracoid process where the short head of biceps inserts (it is painful!)
-
Palpate for crepitus by simply feeling over the joints while moving the shoulder.
5.3.2.4 Range of Motion
-
The aim is to differentiate between intra-articular and extra-articular pathology.
-
In intra-articular pathology (arthritis), active and passive ROM are limited due to inflammation of the synovial membrane that moves during both active and passive ranges. There is usually effusion that might limit the ROM whether it was passive or active. Even if here was no effusion, the inflammation of the synovial membrane itself would limit the ROM passively and actively because of the pain.
-
In extra-articular pathology (periarthritis), the active range is limited only. Here, there is synovial membrane inflammation to limit any kind of movement in the joint. Instead, there is pathology in structures around the joint like in RCT or subacromial (subdeltoid) bursitis. Here the active ROM will be limited but the passive is not.
-
You need to test two components to determine with accuracy the cause of the pain.
-
Active ROM was assessed during the screening exam.
-
For passive ROM: watch the location of your hands!
-
Place your right hand on the right shoulder over AC joint firmly. This is to stabilize the scapula in order to do isolated GH joint movement without scapular elevation. The other hand should hold the proximal forearm.
-
Do shoulder abduction up to 90°. This is a pure GH joint movement. Normally, there should be zero scapular elevation. Then do ER and IR, while the shoulder is abducted at 90°. Then adduct the shoulder back to zero position where the forearm and the elbow are just beside the body. Then do extension. Then remove your right hand on the right shoulder and do forward flexion.
-
You can assess ER + IR while at zero abduction with arms on the sides.
-
Repeat the same approach for the left shoulder with your left hand stabilizes the scapula over the left AC joint.
Principle
To assess tendons you need to stretch the tendon (impingement) and/or stress it!
5.3.2.5 Special Tests
Several MSK examination techniques will be described to assess for specific diseases affecting the shoulder joint. The emphasis should be as stated earlier on the combined evaluation for any patient with MSK complaints of the history and MSK examination findings in order to reach to a correct diagnosis. The diagnostic accuracy for majority of these tests is limited [5]. However, combining careful history taking skills with competent MSK examination findings should help improve the diagnostic accuracy at least to narrow your differential diagnosis rather than reaching an accurate diagnosis.
5.3.2.5.1 For RCT
-
Painful arc (as described above): from 120° to 60°.
-
Isometric resisted abduction while the arm is in zero degree. If there is pain developing, this could be due supraspinatus tendinitis.
-
Empty can sign:
(Shoulder abducted 90° + forward flexion 30° away from the body on horizontal line + thumb down (IR)—supraspinatus) (Fig. 2.18).
Fig. 2.18 
Supraspinatus examination (“Empty can” test)

5.3.2.5.2 Infraspinatus and Teres Minor
-
Isometric resisted ER (elbow flexed 90° with the arm at the side).
In the same position, you can assess isometric resisted IR for subscapularis tendinitis (Fig. 2.19).
Fig. 2.19 
Infraspinatus and teres minor examination

5.3.2.5.3 Left off Test
This test is performed with isometric resisted IR while the patient adducting his shoulder and internally rotating it. Presence of pain while resistance may indicate subscapularis tendinitis (Fig. 2.20).

Left off test
5.3.2.5.4 Hawkins Impingement Sign
Shoulder horizontal adduction in 90° of flexion then adduct shoulder more with passive IR; this should reproduce symptoms (Fig. 2.21).

Hawkins’ test for subacromial impingement or rotator cuff tendinitis
5.3.2.5.5 Drop Arm Test (Fig. 2.22)
This is to test for complete supraspinatus tear. Sudden push to an abducted shoulder may result in arm drop if there is complete supraspinatus tear.

Arm drop test
5.3.2.5.6 For AC joint:
-
Painful arc (as described above): when it produces pain from 180 to 120. It is usually due to AC joint pathology rather than RCT.
There is another test called cross-body adduction test (Fig. 2.23). The patient simply performs horizontal adduction with the shoulder in flexion. This might reproduce pain due AC joint pathology.
Fig. 2.23 
Cross-arm test for acromioclavicular joint disorder
-
For bicipital tendinitis:
-
Speed’s test: resisted shoulder flexion at 90° with elbow extended and forearm supinated.
-
Yergason’s sign (Fig. 2.24): resisted supination of the forearm with elbow 90° flexion. It has to be noted that rupture of the long head of biceps is rarely associated with significant weakness in elbow flexion. This is probably due to the fact that 85% of elbow flexion is from brachioradialis and short head of biceps rather than from long head of biceps.
Fig. 2.24 
Yergason test for biceps tendon instability or tendinitis
-
-
For glenohumeral joint instability:
-
Anterior apprehension test (Fig. 2.25) (supine, 90 ABD and 90 ER, apply gentle forward pressure to posterior aspect of humeral head).
Fig. 2.25 
Apprehension test for anterior instability


6 Musculoskeletal Examination of the Lower Limb Joints
The joints included in lower limb are ankle, knee, and hip. As in the upper limb section, there is a brief review of the important anatomical landmarks that should be mastered because it has clinical correlations. This will be referred to as the first step. Then an approach to pain originating from this joint will be discussed focusing on anatomical differential diagnosis. The second step will be to follow the stated approach in MSK examination with descriptions whenever it is necessary. Illustrations have been used sometimes as a self-explanatory toll.
6.1 Ankle Joint
6.1.1 First Step: The Anatomy
-
Bones of the Foot (Fig. 2.26)
Fig. 2.26 
Bones of the foot
-
Ankle and foot consist of 26 bones, 33 ligaments, and more than 100 muscles and tendons. The main structures are:
-
Bones: tibia and fibula and tarsal bones, which are calcaneus, talus, navicular, and cuboid, and three cuneiforms bones, five metatarsals, 14 Phalanges (proximal, intermediate and distal), and two sesamoid bones.
-
Joints: ankle joint, subtalar joint, metatarsophalangeal joints (MTP), and interphalangeal joints.
-
Ligaments: anterior and posterior tibiofibular ligament, anterior and posterior, talofibular ligament (ATFL and PTFL) and deltoid ligament (Figs. 2.27 and 2.28).
Fig. 2.27 
Bones and ligaments of the ankle
Fig. 2.28 
Bones and ligaments of the ankle
-
Muscles and tendons: anterior tibialis, peroneal, extensors, and flexors muscles and tendons (Fig. 2.29).
Fig. 2.29 
Achilles tendon and plantar fascia


6.1.1.1 Approach to Ankle Pain
The approach of any patient presents with ankle pain should include:
-
History.
-
Physical examination.
-
Differential diagnosis.
The first step in any history of a joint pain is determining the site of the pain. This simply can be achieved by asking the patient to point out by one finger the site of the pain. The following steps should focus on comprehensive approach to pain analysis including duration, progression, aggravating and relieving factors, and history of trauma. Here, it is important to ask about and examine the patient’s shoes. RA classically affects MTPs and ankles. The first MTP joint can be affected classically by gouty arthritis. History of acute first MTP joint pain with swelling and redness is diagnostic for gout. Acute gout might mimic cellulitis as it may cause soft tissue swelling and redness as well. The first MTP joint can be involved chronically in osteoarthritis. The interphalangeal joints can be involved in psoriatic arthritis (PsA) that might give identical presentation to RA. In addition, PsA might cause diffuse swellings in one or more than one toe called dactylitis. It may cause Achilles tendinitis and/or plantar fasciitis. Subtalar joint is classically affected in osteoarthritis. History of trauma-related pain should direct the attention immediately to soft tissue problems (periarthritis rather than arthritis). Table 2.3 lists the possible differential diagnosis according to the site of the ankle and foot joints pain.
It is always:
-
Inspection
-
Screening exam
-
Palpation
-
Range of motion
-
Special tests
6.1.2 Second Step: The Approach
6.1.2.1 Inspection
Expose both ankles and feet and examine for asymmetry. Then follow the standard approach in inspection as it was explained at the introduction of this chapter.
Remember: Always examine anteriorly, medially, laterally, and posteriorly.
-
Nail: evidence of psoriasis.
-
Skin: scar, redness, rashes, wart, ulcers, blister, calluses, corn, erythema, ecchymosis, change in color.
-
Muscle and tendons: wasting, atrophy, and swelling posteriorly for Achilles tendinitis.
-
Bone and joint: swelling, deformity (hammer toe, clawing or crowding of the toes, hallux valgus of forefoot), arch of the foot.
6.1.2.2 Screening Exam
-
The aim is to screen for gross pathology.
-
It is basically the gait and active ROM testing. For any lower limb joint examined, gait examination is a mandatory step.
-
Ask the patient to walk in a straight line and then on toes and on heels.
-
Ask the patient to run a short distance (if it possible, this is of great value in assessing periarthritis).
-
Ask the patient to hop five times on each foot (if it possible) and then squat and stand from squatting position.
-
This quick screening tool actually has assessed the neuromuscular integrity for the lower limb. Walking on the toes, for example, assessed hyperextension of MTPs. If there is arthritis in these joints, the patient will not be able to perform this. In addition, walking on toes assessed plantar flexion in ankle joints and extension of knees and hips. Squatting and standing from squatting position have assessed, in addition of joints, the strength of proximal muscles. Walking on heels is an excellent screening for plantar fasciitis. The different steps applied in this screening exam assessed as well almost all the nerve roots for the lower limbs.
6.1.2.3 Palpation
The major aim is to look for evidence of arthritis in the form of warmth, effusion, and joint line tenderness. Tenderness might be felt laterally and/or medially if there is ligamentous pathology:
-
Palpate skin and soft tissue (muscles, ligaments, and tendons).
-
Determine joint lines and palpate for tenderness:
-
Ankle joint: (tibia, fibula, and talus joint) perform plantar flexion/dorsiflexion to locate joint line or just medial to the strong tendon of tibialis anterior as it passes over the ankle joint to be inserted at the base of first metatarsal bone.
-
Subtalar joint (talocalcaneal joint): perform inversion/eversion or adduction/abduction of the midfoot to locate this joint. Usually, it can be palpated below and anterior to lateral malleolus.
-
MTPs: Press firmly and intermittently with your thumb and index finger over these joints to illicit tenderness. It is much more reached from plantar aspect than the dorsal aspect of the feet.
-
Medially: Palpate the big toe at the site of the first MTP, and move along the first metatarsal to feel the metatarso-cuneiform joint. Palpate the navicular tubercle, the head of the talus, and the medial malleolus.
-
Laterally: Start palpating the fifth metatarsal bone to feel the styloid process, and then reach the cuboid bone to the calcaneus. Palpate for the peroneal tubercle to the lateral malleolus.
-
Posteriorly: Feel the Achilles tendon and follow its insertion at the calcaneus for any tenderness. Just lateral and medial to the insertion of the Achilles tendon, feel for retrocalcaneal bursitis on both sides (lateral and medial) of the tendon.
-
Inferiorly (plantar aspect): Feel for tenderness at the insertion of plantar fascia under the medial side of the heel.
-
In assessing dorsiflexion: the knee must be flexed for proper evaluation
6.1.2.4 Range of Motion (Fig. 2.30)
-
You have done active ROM in your screening exam, but you may repeat active ROM now for detailed examination.
-
Examination includes passive and active ROM for the following actions: plantarflexion, dorsiflexion, inversion, and eversion of the foot and flexion and extension of the toes, particularly the big toe.
-
Hold the distal leg with one hand while the knee in a flexed position. Then hold the feet from central position just between the ankle and the MTP joints. Now, perform slowly full dorsiflexion (20° from neutral position) by bringing the ankle to the leg, and then push the ankle away from the leg for plantarflexion (50° from neutral position). Now, grasp the feet and perform inversion and eversion. In the same position, you may perform midfoot ad duction and abduction as well. Note any limitation of movement, tenderness, stiffness, and/or end range stiffness.

Range of motion of the ankle joint
6.1.2.5 Special Tests
-
Squeeze test (Fig. 2.31): This test aims to stress the MTPs looking for tenderness due to arthritis. Simply squeeze the sides of MTP joints at the level of the heads of phalanges.
Fig. 2.31 
Squeeze test
-
Peroneal subluxation test:
This is to assess the peroneus longus tendon rupture or instability. Ask the patient to sit down and actively dorsiflexes and everts the foot against resistance; and simultaneously palpate the peroneal tendon posterior to the distal fibula. Pain, clicking, or sensation of instability may indicate subluxation of the peroneal tendon. This test is abnormal when 3–5 mm translocation is present compared with the opposite side.
-
The anterior drawer test (Fig. 2.32):
Fig. 2.32 
Anterior drawer test
Evaluate stability of the anterior talofibular ligament (ATFL): stabilize the anterior portion of the distal tibia and fibula with your hand, and use your other hand to cup the heel of the patient foot and pull it toward yourself.


-
The inversion stress test (Fig. 2.33):
Fig. 2.33 
The inversion stress test
-
Evaluate the stability of the lateral ligament complex (the ATFL and the calcaneofibular ligament (CFL)).
-
Stabilize the anterior portion of the distal tibia and fibula with your hand, and use your other hand to cup the heel of the patient foot.
-
The ATFL is evaluated by maximally plantarflexing the ankle and then inverting the rear foot.
-
The CFL is evaluated by maximally dorsiflexing the foot and then inverting the rear foot.
-
The test is considered abnormal when 10°–15° more inversion is present, compared with the opposite side.
-
-
Test for Morton’s neuroma:
-
Grasp consecutive metatarsal heads and compress them together. If a click, as well as reproduction of the patient’s pain, occurs, a Morton’s neuroma should be suspected.
-
Thompson test (Fig. 2.34):
Fig. 2.34 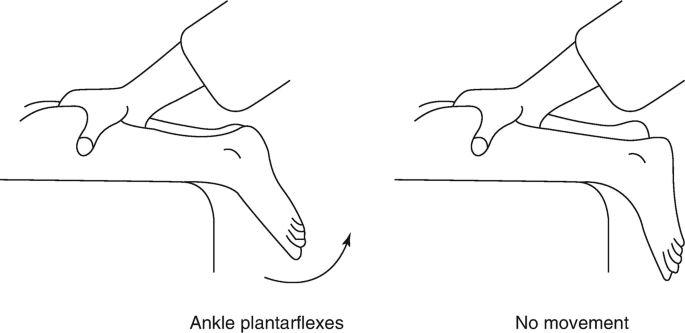
Calf squeeze test
Ask the patient to lie in prone position with the foot hanging off the table, and then squeeze the gastrocnemius muscle. If the foot does not plantarflex, rupture of the Achilles tendon must be considered.


6.2 Musculoskeletal Examination of the Knee Joint
6.2.1 First Step: The Anatomy (Fig. 2.35)
The bones and articulation of knee joints consists of four bones, which are femur, tibia, fibula, and patella. There are three articulations: medial tibiofemoral, lateral tibiofemoral, and patellofemoral articulation. The knee joint has many bursae: in the anterior aspect suprapatellar bursae, prepatellar bursae, and superficial and deep patellar bursae and in the medial aspect pes anserine. Cartilage and ligaments of the knee are anterior and posterior cruciate ligaments, medial and lateral collateral and medial and lateral menisci.

Anatomy of the knee
6.2.1.1 Approach to Knee Pain
The approach of any patient presents with knee pain should include:
-
History.
-
Physical examination.
-
Differential diagnosis.
The first step is to determine the site of the pain. This is achieved by asking the patient to point by one finger to the site of the pain. In some condition like anserine bursitis, the location of the pain is totally away from joint line. Determining the site of the pain is extremely an important step for reaching accurate diagnosis. Detailed history including duration, progression, and aggravating and relieving factors should follow. History of trauma should be clearly outlined particularly if it was sports related. There are many soft tissue structures that can be affected with traumatic injuries. The knee is the most common joint involved in septic arthritis. Symptoms suggestive of an infectious process like fever should be obtained as well. The knee as well is a common joint in osteoarthritis and crystal deposition diseases (like pseudogout).
Table 2.4 provides a classification of the knee pain according to the site of the pain and its differential diagnosis.
6.2.2 Second Step: The Approach
It is always:
-
Inspection
-
Screening exam
-
Palpation
-
Range of motion
-
Special tests
6.2.2.1 Inspection
-
Skin: redness, scars, rashes.
-
Muscles: wasting (note medial fibers of quadriceps), atrophy.
-
Bones and joints: swelling, deformities – genu varus (common in osteoarthritis of the knee joint) and genu valgus deformities.
6.2.2.2 Screening Exam
-
The aim is to screen for gross pathology.
-
It is basically the gait and active ROM testing.
-
Ask the patient to walk and comment if the gait is normal or abnormal.
-
Ask the patient to walk on toes, heels, and squat and stand up from the squatting position (see details in ankle joint exam above).
6.2.2.3 Palpation
-
The major aim is to look for evidence of arthritis in the form of warmth, effusion, and joint line tenderness.
-
Palpate for tenderness over the patella, patellar tendon, suprapatellar bursae, prepatellar bursae (housemaid knees), anserine bursae (medially below joint line, just 2 cm from tibial tuberosity), and tibial tuberosity (where the patellar tendon inserts, it can be tender in patellar tendinitis).
-
Palpate for crepitus, osteophytes, and popliteal cyst.
-
The maneuvers used to detect effusion:
-
1.
Bulge sign:
-
Milk the knee with the palmar or dorsal aspect of your fingers 1–3 times from the tibial side to medial side of the femur. Wait for a few seconds.
-
Now with your fingers, milk the fluid down from the femur side to the tibia laterally. Note the bulge of fluid on the medial side. This method detects mild effusion.
-
-
2.
Patellar tap test:
-
Compress the suprapatellar pouch with one hand. With the tips of the fingers of the other hand, give a sharp downward push on the patella. Feel the patella’s clunk against the femoral condyles. This method detects moderate effusion.
-
-
3.
Balloon sign:
-
Compress the suprapatellar pouch with one hand. Place the thumb and index (or long) finger of the other hand on either side of the patella at the level of the joint line. Now if you press with these fingers, you should feel the fluid pushing away the other hand. This test is positive for large effusion.
-
-
1.
6.2.2.4 Range of Motion
The aim is to differentiate between intra-articular and extra-articular pathology.
-
In intra-articular pathology (arthritis), active and passive ranges of motion are limited (see explanation in shoulder joint exam).
-
In extra-articular pathology (periarthritis), the active range is limited only.
-
You need to test two components: active and passive ROM.
-
Ask the patient to bring both heels toward the pelvis as much as possible (flexion), and then ask the patient to put his knees flat on the bed (extension).
-
For passive ROM testing, ask the patient to relax. With one hand covering the entire knee anteriorly and the other holding the heel, flex the knee and then extend it. You should comment on tenderness, stiffness, end of range stiffness, and/or limitation of movement.
6.2.2.5 Special Tests
-
The aim is to look for the integrity of menisci and ligaments around the knee.
-
For menisci integrity, you can use the McMurray test (Fig. 2.36): hold the knee with one hand, while the patient is in supine position. Bring the knee to full flexion. Now, extend the knee slowly with applying valgus stress from the lateral aspect of the knee you are holding with your hand, while the other hand is externally rotating the knee from the ankle. The test is considered positive if there is pain and/or popping sound.
Fig. 2.36 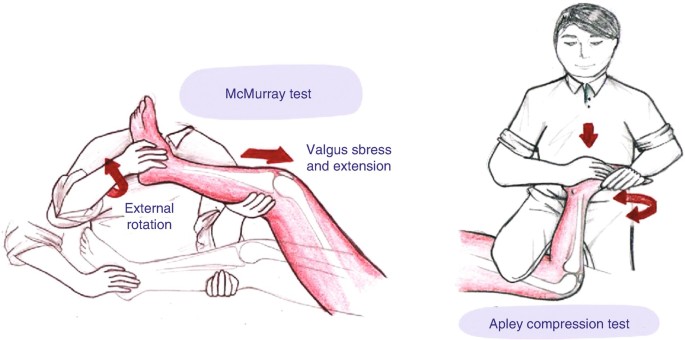
McMurray test and Apley compression test
-
Apley’s compression test: here the patient lies in prone position with the knee being examined flexed at 90°. You should stabilize the knee by placing your leg pressing over posterior aspect of the patient’s thigh. Apply now compressing pressure over the knee from the ankle with external rotation force. The test is considered positive if it produces pain.
-
For cruciate ligaments (CL), you can use the anterior drawer test (Fig. 2.37): you should sit on the patient’s feet for stabilization the flexed knees to around 90°. Place your hands on the tibial plateau from medical and lateral aspects, and then try to push tibia anteriorly over the femur toward your side (anterior drawer test) or posteriorly (posterior drawer test). Any displacement particularly when compared with the other knee is considered positive for cruciate ligament instability. The Lachman test: the patient here is in supine position. You should place one of your hands above the knee joint line with a good grasp, while the other is just below the knee joint line. In around 20–30° of passive knee flexion, try to apply contradicting forces by two hands; one pushes anteriorly while the other pushes posteriorly. Any excessive displacement is considered positive (Fig. 2.38). The validity of these tests has been questioned [5]. In general, this test is more sensitive than the anterior drawer test [4].
Fig. 2.37 
Anterior drawer test
Fig. 2.38 
Lachman test
-
For collateral ligaments, you can apply valgus and varus stresses, while the knee is held in 40–70° of flexion to assess for medial and lateral collateral ligaments, respectively. With positive result, there will be laxity and wide openings of the joint.


6.3 Musculoskeletal Examination of the Hip Joint
6.3.1 First Step: The Anatomy (Fig. 2.39)
The hip joint is formed by the articulation between the round head of the femur and the acetabulum. It is a ball and socket joint with one part, the acetabulum, which is fixed in the body. Three bones compose the acetabulum: Ilium, ischium, and pubis. Femoral neck, Greater Trochanter (GT), and lesser trochanter are bony structures of anatomical significance. Femoral neck is vulnerable site for osteoporotic fractures. This site is used to measure bone mineral density to diagnose osteoporosis. The insertion of hip abductors and extensors are at the GT. While the hip flexor (iliopsoas) inserts at the lesser trochanter. An important bursae covers the GT which can be inflamed and cause symptoms. Symphysis pubis is a fibrocartilage that can cause symptoms.

Anatomy of the hip joint
6.3.1.1 Approach to Hip Pain
It is important to determine the site of pain. This is an essential step in the history of any joint pain. True hip joint pain (due to arthritis of head of femur articulating with the acetabulum) can be felt only anteriorly in the groin region. In the case of hip arthritis, you can expect to find, in addition to groin pain, severe limitation in the ROM actively and passively. Hip joint is a deeply seated joint; for this reason aspiration is always performed under fluoroscopic or US guidance. Pains that felt elsewhere in the hip region could be due other structures around the hip joint and still called by patients as “hip pain.” Trochanteric bursitis is a classical example of a lateral hip pain in moderately obese female. Here there is tenderness by palpation in the lateral hip, and the active adduction and/or abduction may be painful, but usually the passive ROM is intact. In meralgia paresthesia (lateral cutaneous nerve entrapment), there is usually pain in the anterolateral hip region with entirely normal ROM. There are many structures posteriorly that can cause pain. Sacroiliac joint gives rise to posterior hip pain and usually referred to by some patients as buttock pain. Lumbar radiculopathy is another differential diagnosis. The patient should be asked then to point to the site of hip pain by one finger to exactly determine it. Table 2.5 summarizes the most important differential diagnosis of hip pain according to its site.
6.3.2 Second Step: The Approach
It is always:
-
Inspection
-
Screening exam
-
Palpation
-
Range of motion
-
Special tests
6.3.2.1 Inspection
-
You should start inspection from standing position and inspect anteriorly, laterally, and posteriorly. Then you can continue your examination after screening exam and palpation, while the patient is in supine position.
-
Standing:
-
Back:
-
Skin: redness, scars, rashes.
-
Muscles: wasting, atrophy.
-
Bones and joints: assess symmetry and pelvic obliquity – inspect posterior superior iliac spine (PSIS) (dimples of Venous) as they should be align to one level. Asymmetry may give clues to cases with chronic low back pain without apparent etiology. Inspecting gluteal folds, tip of scapula can assess symmetry.
-
-
Lateral: inspect for lumbar lordosis and possible swelling or redness over greater trochanter.
-
Anterior: symmetry can be assessed by inspecting anterior superior iliac spine (ASIS). Rarely, fullness in the groin region may indicate hip arthritis. However, significant hip joint pathology can occur without apparent swelling. Inspect also for rashes, redness, and scars.
-
6.3.2.2 Screening Exam
-
Apparent leg length: from xiphoid cartilage or umbilicus to medial malleolus
-
True leg length: from ASIS to medial malleolus
-
The aim is to screen for gross pathology.
-
It is basically the gait and active ROM testing.
-
Note position: external rotation (ER) indicates hip joint pathology as internal rotation (IR) is lost first in arthritis.
-
See ankle joint exam above for details of gait assessment. Simply you should ask the patient to walk/turn/walk on toes/on heels/squat (if possible) and stand from squatting position. This is a comprehensive evaluation of the neuromuscular integrity of the lower limb. Walking by itself is a good screening for hip flexion and extension. Squatting position is a good screening again for hip flexion and extension.
-
Assess Trendelenburg sign: ask the patient to stand on the affected side that has classically hip joint arthritis (diseases like osteoarthritis) with week hip abductors and extensors. Then ask the patient to raise the normal side. Normally, the pelvis in the unsupported side will be raise due to the tone of strong muscles from the other supported side. In this sign and because of weakness of hip muscles from arthritis, the muscle tone here cannot support the pelvis in the other unsupported side, and this will result in pelvis drop in the unsupported side with positive sign. Trendelenburg gait is basically the same explanation, but when the patient needs to walk, bending laterally toward the supported side will raise the dropping unsupported pelvis producing the classical waddling gait with bilateral involvement of both hips.
-
Note the type of gait (Fig. 2.40).
Fig. 2.40 
Types of gait: normal (a) and abnormal (b)

6.3.2.3 Palpation
-
You can start palpation, while patient is still in standing position.
-
Back: palpate paraspinal muscles, sacroiliac joint (SI joint) (1 inch medical + inferior to PSIS), iliac crest, and ischial tuberosity (IT) (you may ask the patient to step on a stool using the limb under examination), feel GT, and feel sciatic nerve between the IT and GT.
-
Lateral: palpate trochanteric bursae (Fig. 2.41).
Fig. 2.41 
Trochanteric and iliopsoas bursae
-
Anterior: palpate groin region – lymph nodes, pulses, hernia, ASIS, hernial orifice, pubic tubercle (where adductor longus originates), symphysis pupis – note any discrepancies in leg length.
-
You may continue your palpation now, while the patient is in supine position.
-
Quick screening: “frog” leg position—external rotation (ER) + abduction (ABD) + knee flexion—then compare both sides. In this position you may feel adductor longus tendon by asking the patient to adduct the hip against resistance and then just follow the adductor longus tendon until its origin from the pubic tubercle. Eliciting pain here may give you the diagnosis of adductor longus tendinitis.
-
Flex hips and knees then extend them and look for leg length discrepancy.

6.3.2.4 Range of Motion
-
You have done active ROM in your screening exam for two important hip movement flexion and extension. Now, you need to do comprehensive assessment of ROM (Fig. 2.42).
Fig. 2.42 
Range of motion testing for hip joint
-
In supine position: ask the patient to flex hip as much as possible; you may combined hip and knee active flexion by asking the patient to bring the knee to abdomen. Back to supine position and ask patient to abduct the hip laterally to as much possible and return to each hip one at time and ask the patient to cross midline. This is adduction. Back to supine position, and ask the patient to bring both plantar surfaces of both feet together facing each other with both knee flexed. This is external rotation (ER), and it is called “frog” leg position. The opposite of this position is the assessment of internal rotation (IR). The other position for active ER and IR is while patient is sitting at the edge of the bed with the knees and hips flexed. Bringing the leg away is IR and toward the midline is ER. The same technique can be done while the patient is supine. Extension can be assessed while the patient is in lateral decubitus position with the hip moved posteriorly.
-
Active: Flexion 120°
-
Abduction 50°
-
Adduction 30°
-
Frog leg (for ER) 45°
-
Opposite of frog leg (for IR) 35°
-
Or in prone position: do active ER + IR
-
Assess ER + IR through leg rolling while hips are extended.
-
-
In lateral decubitus position: you may palpate trochanteric bursae and perform active extension 30°.
-
The passive ROM can be assessed, while the patient is in supine position. Flex the hip and try to bring it to patient’s abdomen. Back to neutral position, and while putting one hand on the pelvis, take the hip to abduction, and use the same technique for the other hip. Perform passive adduction by crossing midline. For ER, flex hip and knee to 90°, then hold knee with one hand and the heel with the other hand, and then bring heel medially. For IR: bring heel laterally. Assess passive extension in lateral decubitus position or in prone position.

6.3.2.5 Special Tests
-
Hip fixed flexion deformity:
-
Thomas test: bring both knees to patient’s abdomen and then extend one hip. If it failed to extend fully, there is fixed flexion hip deformity.
-
Trochanteric bursitis:
-
Tenderness over GT with pain elicited by resisted abduction.
-
Radiculopathy:
-
Straight leg raising test and slump test (see back exam).
-
Piriformis syndrome:
-
Resisted abduction while hip is flexed at 90° and adducted (Fig. 2.43).
Fig. 2.43 
Testing for piriformis syndrome
-
Tightness in iliotibial band (Ober’s test):
In lateral decubitus, neutralize hip and knee at 90°, and then abduct hip: a tight iliotibial band prevents the hip from adducting passively (Fig. 2.44).
Fig. 2.44 
Ober’s test


7 Back Examination
7.1 First Step: The Anatomy
-
The spine represents the axial skeleton of the back, and it is composed of 32–33 small bones, called vertebrae (7 cervical, 12 thoracic, 5 lumbar, 5 fused sacral, and 3 or 4 coccygeal) (Figs. 2.45 and 2.46). The vertebrae bear the majority of the body weight and transfer it to lower limbs and also provide protection and support to spinal cord. A typical vertebra is consisted of anterior body and posterior arch enclosing the vertebral canal where the spinal cord extends from the brain to the area between the end of first lumbar vertebra and top of second lumbar vertebra (L1 or L2 vertebral levels). Between each vertebra is a cartilaginous joint, called intervertebral disc. The discs limit the movements between the individual vertebrae and also act as a shock absorber (Fig. 2.47). The vertebral bodies are strictly attached to the intervertebral discs by two main ligaments: anterior and posterior longitudinal ligaments. Each pair of vertebrae is also connected by a synovial joint called facet joints. This is formed by the inferior articular process of one vertebra joining the superior articular process for the vertebra just below it. The facet joints give the spine its flexibility as there are two facet joints between each pair of vertebrae, one on each side. While the joints allow flexibility, the mobility of the spine is provided by the surrounded paraspinal muscles extended laterally along the spine.
Fig. 2.45 
Bones of the spine [6]
Fig. 2.46 
Structures of lateral spine
Fig. 2.47 
Structure of a vertebra
-
In the vertebral foramen posteriorly, the spinal cord extends down to the end of the second lumbar vertebra. Below this level, the spinal canal forms a group of nerve fibers, called the cauda equina. This group of nerves goes to the pelvis and lower limbs. Attached to each segments of the spinal cord, there is a pair of 31 spinal nerves exiting the vertebral foramina through vertebral notches of the adjacent pedicles. The spinal nerves exit the intervertebral foramina in relation to vertebral levels as the following: nerves of C1-C7 exit superior to the pedicles of the same-numbered level, C8 nerve inferior to C7 pedicles, and then T1 and below exit inferior to the pedicles of the same-numbered level.
-
Different injuries and diseases may affect the components of spine and its surrounded paraspinal muscles resulting in back pain (Figs. 2.48 and 2.49) (See Chap. 6).
Fig. 2.48 
Some surface anatomy landmarks
Fig. 2.49 
Vertebral column [7]


7.2 Second Step: The Approach
It is always:
-
Inspection.
-
Screening exam.
-
Palpation.
-
Range of motion.
-
Special tests.
7.2.1 Inspection
You may start your examination by explaining to your patient the steps of your exam. After proper exposure, start your inspection, while the patient is standing. You may ask one of the family members to be around.
Always inspect the patient posteriorly, laterally, and anteriorly.
-
Alignment: you should be familiar with the normal alignment of the spine. This is to help inspect for abnormal alignment that may give rise to chronic back pains: kyphosis, scoliosis, and exaggerated or lost lumbar lordosis. In patients with ankylosing spondylitis (AS), lumbar lordosis is usually lost from spondylitis. This also can be lost due to severe muscle spasm over the lower back.
-
Skin: Inspect for erythema, hair patch, café au lait spots, nodules, and/or scars.
-
Muscles: wasting, atrophy.
-
Symmetry: check symmetry of the back by assessing whether tips of scapulae are at one level or not. Also for the iliac crests and gluteal folds. Inspect PSIS (dimples of Venous) as they should be align to one level. You may ask the patient to flex the hip and observe while you are standing behind the patient the symmetry and whether the asymmetry is corrected or not.
7.2.2 Screening/Gait Assessment
-
Gait: straight walking while watching for abnormal flexion (suggestive of spinal stenosis or facet joint pathology), abnormal extension (suggestive of disc pathology), or Trendelenburg gait (Fig. 2.50).
Fig. 2.50 
Trendelenburg sign: (a) normal response. (b) Abnormal response with drop of the pelvis in the unsupported leg due to weakness in the opposite (supported leg) muscles. This will result in Trendelenburg gate
-
Screening for neurological integrity: walking on toes (L5, S1) and then on heels (L4, L5), knee extension (L3, L4); then ask patient to squat and stand from squatting position, hip flexion (L2, L3), and hip extension (L5, S1).
-
Position: watch as patient changing position.
-
Asses Trendelenburg sign (see hip joint exam): the patient stands on affected side and then raises the normal side, and in a positive test, the unsupported side will drop.
-
Note the type of gait: normal gait passes through two phases stance and swing phases. The stance phase consists of heel strike, mid-stance, and toe off. The swing phase has an acceleration and deceleration components. A common gait abnormality in rheumatology is antalgic gait which is simply short stance phase gait due to pain in one of the lower limb joints.

7.2.3 Palpation
Start palpation while patient is in prone position. Palpate spinous processes over the midline from cervical down to sacral regions (Fig. 2.51). You may percuss to illicit severe tenderness that might indicate discitis. You may palpate now the paramedian spinal structures including muscles (for tenderness and/or spasms as majority of low back pain is caused by muscle strain and/or spasm), interspinous or supraspinous ligaments, and facet joints. Keep in mind the low specificity of these techniques. You may palpate now iliac crests for tenderness suggestive of enthesitis a hall mark feature of spondyloarthritis, while palpation observe any skin and/or soft tissue fluid collection suggestive of an abscess. Palpate the dimples of Venus at the level of S2 as the sacroiliac joints lie beneath them. It can be severely tender in sacroiliitis. You may ask the patient to stand and put his feet on a chair or a stool and you can posteriorly identify by palpation two bony prominences: the ischial tuberosity medially and the GT laterally. The sciatic nerve can be palpated in the area between these two. Severe tenderness can be illicit in patients with sciatica and/or piriformis syndrome.

Areas for palpitation
7.2.4 Range of Motion
This can be assessed by asking the patient to perform the following:
-
Flexion: ask patient to bend forward with extended knees and bring fingers to floor. The distance between the long finger and the floor can be documented and used to follow up response of treatment in cases of spondylitis.
-
Extension: stabilize the pelvis and ask the patient to extend the back as much as possible. Figure 2.52 demonstrates ROM of cervical spine.
Fig. 2.52 
Range of motion of cervical spine
-
Lateral flexion: The patient may stand against the wall and bend laterally and trying to slide the fingers to fibula. The distance between the long finger and the fibula or the floor can be documented and used in monitoring response to therapy in spondylitis (Fig. 2.53).
Fig. 2.53 
Range of motion of thoraco-lumbar spine. (a) Flexion and extension. (b) Rotation. (c) Lateral extension
-
Thoraco-lumbar rotation: This is best examined while the patient is sitting at the edge of the bed. Ask the patient to turn to the side without moving the pelvis as much as possible; up to 70° can be achieved normally. This movement can be checked passively to examine for any tenderness, stiffness, limitation, and/or end of range stiffness (Fig. 2.53).


7.2.5 Special Tests
7.2.5.1 Straight Leg Raising Test (SLRT) (Fig. 2.54)

Straight leg raising test
This is to test for radiculopathy of L5-S1. Keep the patient in supine position with extended hip and knee. Then flex the hip slowly until a complaint of shooting radicular pain or tightness is reached. The test can be considered positive with classical radiation of the pain at 30–70° of leg elevation. Just lowering the examined leg few degrees before the pain appeared and then passive dorsiflexion of the ankle is performed as a confirmatory technique. Symptoms should recur in strongly positive test (Fig. 2.55).

Another approach to test for radiculopathy at L5-S1
7.2.5.2 Slump Test (Fig. 2.56)
This test is performed again to look for radiculopathy at L5-S1. The patient should be sitting at the edge of the bed with both arms stabilized over the back. You should flex the outstretched extended leg to be examined by holding the toes or the ankle, and at the same time, ask the patient to flex the neck and bring the chin to the chest wall. A shooting radicular pain might result from this stretch indicating a positive test.

Slump test
7.2.5.3 Sacroilliac Joints Exam
Patrick test and compression test: perform (FABER test (flexion abduction external rotation test)) Fig. 2.57. Flex the hip, abduct, and externally rotate it while the other leg in extended. Then compress over the iliac crest of the extended leg and over the knee of the flexed leg. A positive test produces pain in the sacroiliac joint of the leg being tested.

FABER test (flexion abduction external rotation test)
7.2.5.4 Modified Schober’s Test
This test is to assess for limited lumbar spinal flexion. Mark the PSIS (dimple of venous) by drawing a line connecting both points. At the center of this line, mark a point. Using a tape measure placed at the center point, mark 5 CM below this line and 10 CM above this line. Then ask the patient to bend forward without bending the knees. Now, measure the distance between the points. The distance between the two points should be more than 15 by 5 additional CM (≥ 20 CM). Any movement that results in less than this is considered abnormal.
7.2.5.5 Neurological Exam
Detailed neurological exam should be conducted. The motor findings are reliable and should direct further intervention with the patient. One of the simple tests to perform is muscle bulk by a tape measure from a fixed bony prominence. More than 1 CM difference is considered abnormal for patients presenting with radicular symptoms. Rectal tone (S3,4,5) should be also performed in the right clinical settings. Fig. 2.58 represents a quick tool to examine in brief the roots of the lower limb. This quick approach includes examining the power of the following movement (note that it goes for simplicity from 2 to 5): hip flexion (L2), knee extension (L3), ankle dorsiflexion (L4), big toe extension (L5), and ankle plantar flexion (S1). This is in addition to sensory exam as shown in Fig. 2.59. Sensory level is an important clinical finding to be determined in the right clinical setting in order to decide on further intervention and follow-up. Figure 2.60 summarizes the steps of back examination.

Quick tool to examine in brief the roots of the lower limb

Levels of principle dermatomes of the lower limb

Summary of back examination
References
Woolf AD, Walsh NE, Akesson K. Global core recommendations for a musculoskeletal undergraduate curriculum. Ann Rheum Dis. 2004;63(5):517–24.
Woolf AD, Pfleger B. Burden of major musculoskeletal conditions. Bull World Health Organ. 2003;81(9):646–56.
Almoallim H, et al. Sensitivity of standardised musculoskeletal examination of the hand and wrist joints in detecting arthritis in comparison to ultrasound findings in patients attending rheumatology clinics. Clin Rheumatol. 2012;31(9):1309–17.
Solomon DH, et al. The rational clinical examination. Does this patient have a torn meniscus or ligament of the knee? Value of the physical examination. JAMA. 2001;286(13):1610–20.
Hegedus EJ, et al. Physical examination tests of the shoulder: a systematic review with meta-analysis of individual tests. Br J Sports Med. 2008;42(2):80–92; discussion 92
Yoganandan N, Dickman CA, Benzel EC. Spine surgery. Copyright © 2012, Copyright © 2012, 2005, 1999 by Saunders, an imprint of Elsevier Inc.
Hansen JT. Netter's Clinical Anatomy. Copyright © 2014, Copyright © 2014 by Saunders, an imprint of Elsevier Inc.
Acknowledgments
The authors are grateful for the help provided by Mohamed Cheikh, Mawaddah Al hadeedi, Abdulrahman Kabli, Rehab Simsim, and Waleed Hafiz in composing this chapter.
Author information
Authors and Affiliations
Corresponding author
Editor information
Editors and Affiliations
Rights and permissions
Open Access This chapter is licensed under the terms of the Creative Commons Attribution 4.0 International License (http://creativecommons.org/licenses/by/4.0/), which permits use, sharing, adaptation, distribution and reproduction in any medium or format, as long as you give appropriate credit to the original author(s) and the source, provide a link to the Creative Commons license and indicate if changes were made.
The images or other third party material in this chapter are included in the chapter's Creative Commons license, unless indicated otherwise in a credit line to the material. If material is not included in the chapter's Creative Commons license and your intended use is not permitted by statutory regulation or exceeds the permitted use, you will need to obtain permission directly from the copyright holder.
Copyright information
© 2021 The Author(s)
About this chapter

Cite this chapter
Almoallim, H., Kalantan, D., Alharbi, L., Albazli, K. (2021). Approach to Musculoskeletal Examination. In: Almoallim, H., Cheikh, M. (eds) Skills in Rheumatology . Springer, Singapore. https://doi.org/10.1007/978-981-15-8323-0_2
Download citation
DOI: https://doi.org/10.1007/978-981-15-8323-0_2
Published:
Publisher Name: Springer, Singapore
Print ISBN: 978-981-15-8322-3
Online ISBN: 978-981-15-8323-0
eBook Packages: MedicineMedicine (R0)